All right stop! Collaborate and listen (Sharing Points)

December 8, 2008

Changing the Divisions and Regions for new sites in your MOSS Portal

Filed under: Sharepoint, Vista/MOSS — Tags: , , — stephenmuller @ 12:48 am

Tip of the day (well month)

When you create a new site using MOSS, down the bottom the site creation page are some Site category selections. Currently these exist as Divison and Region.


I have noticed that most people seem to ignore these settings, but they can be very useful. Hopefully this post will show you how they can be used. Its not hard core or technical at all just something I believe people are not exploring enough.

sd24

These categories are used in the Site Directory collection in your MOSS site. These categories can help users to quickly locate the particular site that they are after, this is especially important on larger sites.

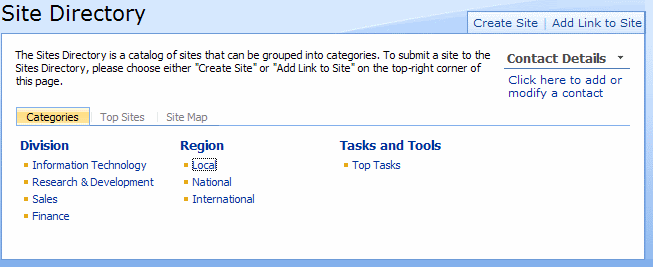
It looks a little like this, and it accessed from the navigationbar in your site, its just called Sites.
sd11

Clearly just using Division and Region may not be useful to you but they can be changed easily. Although it is not very obvious, when you first start to look. The steps to chnage them are;

First navigate to the Sites site collection. Here you will see the various departments and divisions as hyperlinks on the web page (see image above). When you click on a link it will show you what sites have been grouped under that category.

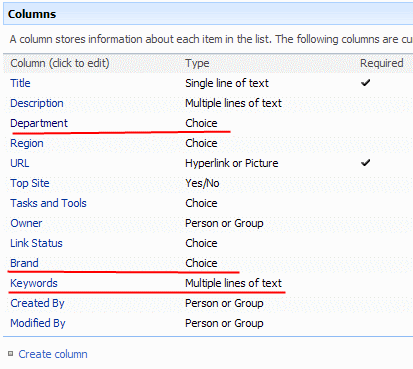
To change the categories, simply click View All Site Content in the quick launch, then select the Sites List. When you edit the list settings you will notice the Region and Division Fields. You can now remove and add your own columns as per usual.

You can see that I added some more columns (Brand, Department) and choice values as well as a text box where user could write some keywords about the site which will help users locating it by a basic search (As Metadat gets added in the search index) I also removed the Division column. You have a lot of flexibility here so go and explore.
sd61

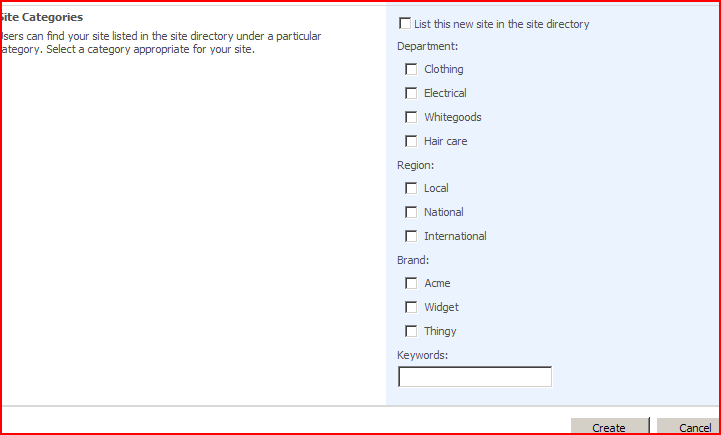
When you add theses columns they will appear in the create new site page, where you can now select the values you wish.
sd51

When the site is saved and you return to the Sites hompage you can see the new columns and vlaues appear as selecteable hyperlinks. Notice as well that the keywords do not appear, I suspect only the the choice values or Yes/No will appear which makes sense.
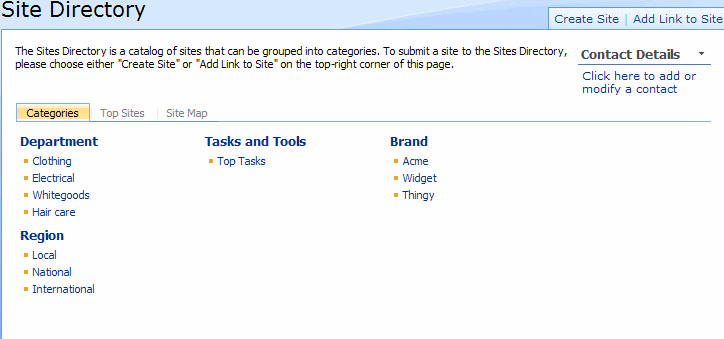
sd41

You can see, I hope, that you can really customise and utilise these fields to assit in providing a useable site directory as well as adding searchable terms to the sites to help users locate them via the search. This is all about providing an easy way for users to quickly locate a site no matter where it is located in your structure.

I am sure there are lots of things you can do with the new columns and values. Ideally the vlaues should be form a look up list as well.

Also you could add some really nice webparts on the directory page. For example with the Keyword field you may well be able to do some sort of tag cloud. You can also custiomise the page by using the tabs list which you can access from the Site Content List but I wont go into that…yet.

Again if you have any issues or questions let me know.

November 10, 2008

Gantt chart web part render problems

Filed under: MOSS — Tags: , , , — stephenmuller @ 10:32 pm

I have noticed that when a gantt chart view web part is dropped on a page the gantt chart scrolls of the edge. I never really got around to looking at it but Heather Solomon has done a fix for it. The link is below

http://heathersolomon.com/blog/archive/2008/11/10/SharePoint-2007-Design-Tip–Gantt-View-with-custom-master.aspx

October 27, 2008

Rounded corners in Infopath

Filed under: Infopath — Tags: , , — stephenmuller @ 12:21 am

Gavin Mckay, a co-worker of mine has written an article on how to create rounded corners in Infopath. I do dislike the standard look and people love rounded corners..

Hopefully he will up load a picture…..

Anyway link is here

http://gavinmckay.wordpress.com/2008/09/24/howto-add-rounded-corners-to-an-infopath-2007-form/

July 17, 2008

Using the DIP and Quick Parts with Office Pt 1

Filed under: Infopath, MOSS, Office 2007 — Tags: , , , , — stephenmuller @ 12:33 am

This will be a two part post as it may be long.

Last night I did a very quick and broad overview of using and modifying the Document Information Panel via Infopath for SharePoint. I got some interesting feedback and will be looking at it further. This is the first pass on using the DIP and also leveraging the Quick Parts features in Office to create a user friendly and intuitive form template for users. This will cover a process of creating a content type, modifying the DIP and changes to the word template.

Items for this project include

  • MOSS, I do not believe that you can edit the DIP via WSS (but I am waiting to be corrected on this).
  • InfoPath 2007
  • Office 2007

Im also making a bit of an assumption that you know your way a little around InfoPath as it just becomes long to describe, if you have any issues please email me.

Create the Content Type and Document Information Panel

I created a site level content type as shown below.


The Project Managers Metadata in the content type is a lookup to a contact list on this site (This is important later on). In this contact list I added a yes/no field called Project Manager. I will use this flag later on.

Edit the Document Information Panel

To edit the DIP select the Document Information Panel Settings link on the CT page.

I check the Always show Document Info….. Check box at the bottom of the screen to ensure it is always visibe to users.

To create a new DIP click the Create a new custom template link.  This will launch InfoPath for you to edit the DIP. Click the Finish button when the Data Source Wizard Appears (read it first :)). The InfoPath form should look like this

Note how all the custom metadata fields are auto-loaded in the form. You will also have access to all InfoPath functions. When you get a chance have a play with the functions, I will only utilise some and I am not an expert on all of them so if you find anything nifty like using activeX controls let me know.

The first thing I will do is limit the Project Managers field to only show the contacts that I have flagged as Project Managers, so users can only select the Project Managers. (This will use the flag in the contacts list as mentioned above).

To do this select the ensure that the Project Management field is available via opening up the Data Connections in the Tools menu and select the only Data Connection string in the list  and follow the bouncing ball to ensure that the Project Management field is checked, should be by default.

Side point: The Data Connections are used to connect to the Sharepoint lists that have been used in the lookup fields on metadata. The naming is yucky so if you have several lookups in your form then check the name by editing the properties of the dropdown of the field and checking the name of the list that is used. You can also add your own data connections to any other SharePoint lists that you have (great feature), or web services.

After you exit out of the Data Connections wizard select the Project Manager field on the InfoPath form then select Drop-Down List box Properties. In the Entries Field click the funny button next to it. Next expand the nodes in the yellow box and ensure the Contact fields are available but keep the folder above the fields selected (as seen in the image below), I actually had an issue here as the fields were not visible so I had to recheck the data connection, and then it worked.

The next task is to filter the data so click the Filter Data… button a third window will open, to add the filter select the Add Button. All these boxes you can see below.

In the Specify Filter Conditions dialog I selected the Project_Management field then is equal to and in the last drop down the value of 1 (not TRUE).

Click Ok on all the dialogs until you return to the Drop Down List box properties dialog. Ensure the Value and Display name are correct (displaying and storing a field that you wish to view and store). Click OK.

You can check how it all worked by clicking the Preview button on the InfoPath toolbar. If it works great if it does not email me….I may have explained to badly.

To save the form simply select the Publish option from the File Menu. It will prompt you for a physical location to save the file first (Maybe a centralised document library to store them all togeather). Then it wil publisht the form back to the content type just accept all the options in the publishing wizard. When done it is now saved and connected to the content type. You can now use it to your hearts content.

The next phase will be on the next post coming soon, which will talk about making the form pretty and using the Quick Parts…

April 10, 2008

Its the simple things…a view for documents I have worked on

Filed under: MOSS — Tags: , , , — stephenmuller @ 12:59 am

This very simple view has a very large impact with users I have noticed. It is easyand im not claiming to have found anything new just want to pass on a good way to setup a view that has a high impact.

Many users want to see documents that they have been working on. There are a few ways this can be done, one is via a vew on a document library or for a better rollup site wide view a Content Type Query.

Document View

For the view on a specific document library (im assuming you can all add a view if you have trouble just google or email me).

  • create a new view
  • select the fields you wish to see in the list (I keep it simple and just use the name)
  • sort the view by Modified and make sure it is descending
  • The filter is on the Modified by field and in the value type [Me] (there are other values like this including [Today] I will find a list of these and post it)
  • I grouped by Modified so I get all the document I modified grouped by day.
  • I then set an item limit to 10 or so (up to you)

Then just add the view on the home page. Its a winner and so easy. And of course it works for all lists and libraries types.

Content Query

Add the content query web part to the page (I do it to the top level home page)

In the webpart settings I set the

  • Scope to all sites in the site collection
  • The list type to


This will only show me document in document lists and of document content type. If you want something different the select it. Make sure you select to Include child content types as this will mean if anyone creates any content types based on document they will appear in the list.

  • for the filtering section I simply selected Modified By as the field. This is the cool bit here I can select the [Me] option, you will also note here you can select other users to include as well.
  • Unfortunately I cant group by the modified date but I suspect you could do that with XS L.
  • Lastly I Sorted it by the modified date, descending and grouped it to 10 documents.

And there you go. Also the CQWP does not have to just sit on the topsite you can put it on a WSS site (if you have MOSS installed it only ships with MOSS) to view all your documents in that site.

Im sure there are other ways or better ways but this all seems to work well, in allowing users to quickly access their data quickly and easily.

Blog at WordPress.com.